
Today we will show you how to disable the WordPress Cron scheduler. Cron jobs are used to schedule tasks that need to be carried out at a specific time. It may be that the job needs to run every 5 minutes, every hour, or once a week.
For example, you may set a job to check for updates, or carry out a backup. There are many things you can do on an automated schedule which frees up your time to do more important tasks.
The main problem with the built-in WordPress cron scheduler (wp-cron.php) is that it is only triggered if the pages are accessed. If your WordPress site is busy, then this isnt really a problem, however if your site is new or doesnt generate much traffic then you will find your cron jobs wont run.
The better method is to use the OS scheduler, this will ensure the cron jobs are run when they are set to run, this is also the recommended method.
Table of Contents
Requirements
- You will need access to modify wp-config.php
- You will need access to create cron jobs
Modifying The WordPress Config File
In WordPress, the standard configuration is to use WP-Cron, which essentially simulates the OS cron. This can cause further issues and have a negative impact on the performance of your website. In this tutorial, we will show you how to disable WP-Cron and use the OS cron for much better performance and reliability.
Issues with WP-Cron
Unlike the OS (or system) cron, WP-Cron only runs when a webpage on the WordPress website is accessed. There are 2 main issues around this.
Firstly, if the WordPress website is hardly accessed, then your scheduled jobs will never run. Secondly, if the website receives a lot of traffic, then WP-Cron will attempt to run at every page load, thus using more PHP resources, and potentially slowing down the website.
For best practice, we should always disable WP-Cron and use the system cron instead.
Step 1: How to Disable WP-Cron
In order to disable WP-Cron, you will need edit wp-config.php file using SSH, if you dont have access to this, you can instead use File manager within cPanel to edit the file.
Open up the file, scroll to the end of the file and add the following entry
define('DISABLE_WP_CRON', true);
Now save the file and WordPress will now start using the system cron
Step 2: Creating The New System Cron Job
Adding A Cron Job Using SSH
Now we need to wp-cron.php setup a cron job using the OS scheduler, to do this from SSH you will simply run the following command
crontab -eScroll down and add an entry like this, you can change times times to suit your requirements. Replace the domain with your website domain
*/5 * * * * wget -qO- https://www.mywebsite.com/blog/wp-cron.php &> /dev/null
Now press and hold CTRL + O to save the changes, then press and hold CTRL + X to exit.
The system should then confirm the crontab was installed.
Adding A Cron Job With cPanel
If you dont have access to SSH and you are using cPanel to manage your website, then you can simply add a new cron entry using the menu provided.
Step 1
Log in to cPanel, then access Cron Jobs from the Advanced section like below

Step 2
Under the Add New Cron Job section, you can choose from a number of different pre-defined schedules, such as twice per hour or once per week. Your hosting provider most likely has a limit on how often they allow cron jobs to be run. Twice per hour is a common setting for shared hosts.
Scroll down to the ‘Add New Cron Job’ section, here you can choose pre-defined schedules, or create a custom one.
We will choose a pre-defined schedule of 5 minutes and add the following command to be executed
wget -qO- https://www.mywebsite.com/blog/wp-cron.php &> /dev/null
The selections should look like the following
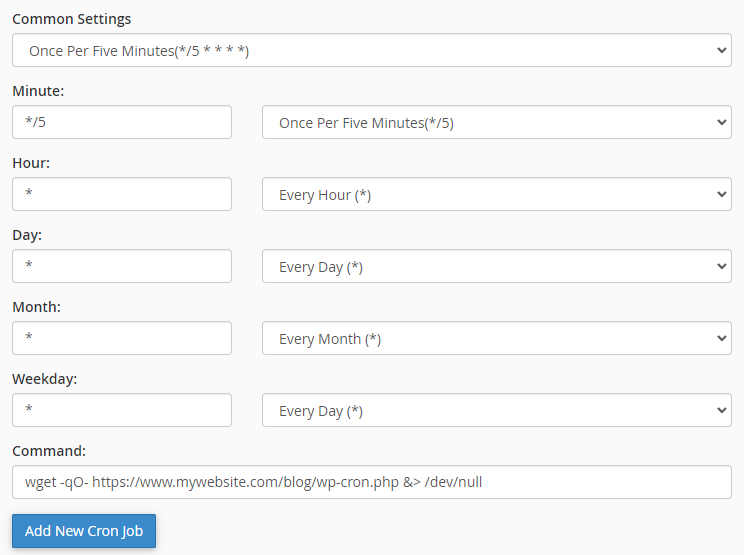
Once you have chosen the schedule, and entered the command, click ‘Add New Cron Job’ to save the settings.
The >/dev/null part of the entry will disable the output result of the command, for example to a log file or email.
Thats is, your WordPress website is now set to use the system cron scheduler and you wont need to worry about jobs within WordPress not being processed correctly
You have now learned how to disable yhe WordPress cron scheduler. If you need any help, please contact our support team who will happily assist you.